
Spire of Insight: what it is and why players search for it
The Spire of Insight is one of three named spires placed inside the Demeniss region of Crimson Desert, and it sits at a useful crossroads between exploration and quest progression. The structure appears in the Steel Mountains subregion, a short distance east of the Eastern Goblin Camp and Ruined Chapel, and southwest of Willow River, which means a player travelling through that part of the map can usually reach the entrance inside a few minutes of riding from any of those three landmarks. Because Demeniss is dense with stone ruins of similar shape and colour, the spire is easy to ride past on horseback, and most first-time visitors realise they have arrived only after the goblin encounter begins.
The spire is built around environmental puzzles rather than combat. Enemies appear at the entrance, but they are weaker than the surrounding fundamentalists, and the real barrier is reading the on-site text, choosing the correct object, and placing it in the right container. Each floor uses a short inscription as a clue, and the wrong interpretation will send a player wandering the same room for several minutes before they reset. The Spire of Insight rewards a careful reader far more than a skilled fighter, and that difference is the reason a written walkthrough is useful even though the puzzles themselves are not technically complex.
This article covers the location, every floor puzzle in the order a player will encounter them, the items you need to find or bring inside, and the reward that justifies the time spent. It also flags the small mistakes that cause most failed runs, and it points to the official sources used to build the guide so the details can be checked against the current build of the game.
Where the Spire of Insight is in Demeniss
The Spire of Insight sits inside the Steel Mountains subregion, which is one of the named areas of the larger Demeniss region in Crimson Desert. According to the IGN walkthrough, it is placed east of the Eastern Goblin Camp and Ruined Chapel, and southwest of Willow River, which gives it a useful set of reference points for any approach from the north, west, or south. In practice, players who follow the ridgeline down from the camp area will see the spire’s stone outcrop from a short distance, and the entrance becomes obvious once the brush around the doorway is visible.
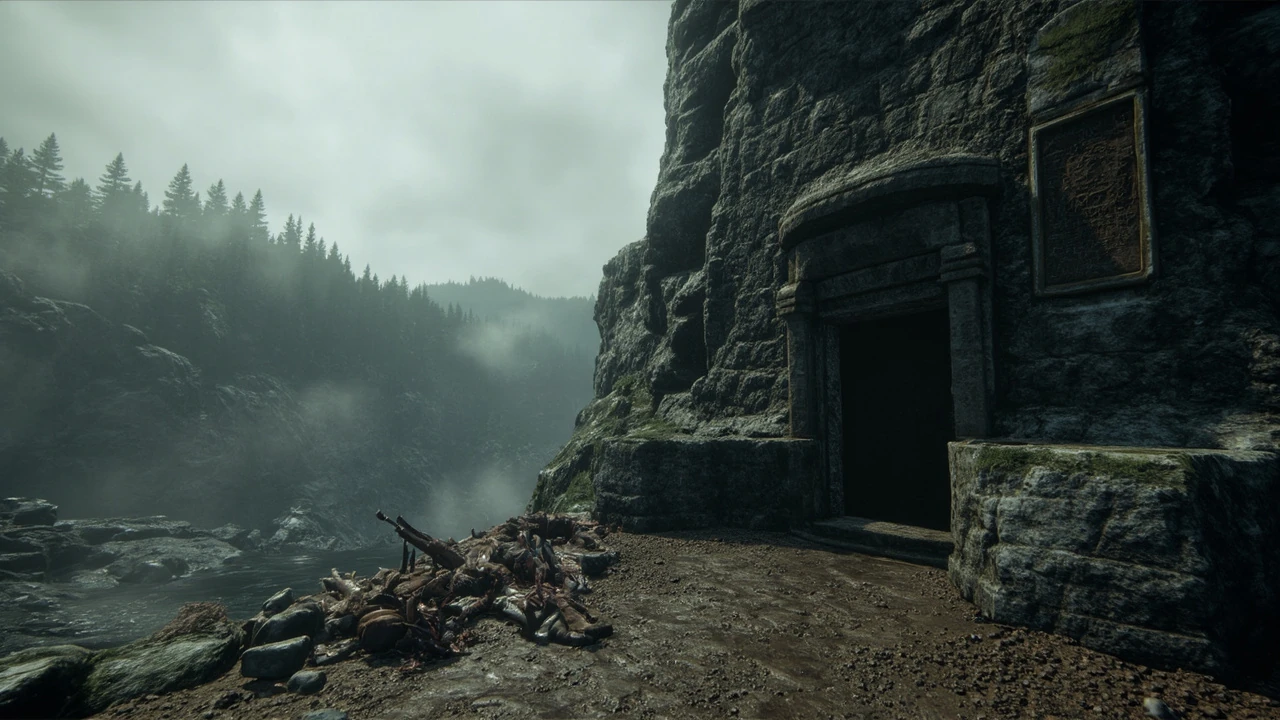
Two practical cues help confirm the location before committing to the goblin fight. First, the entrance path is blocked by brush that does not exist on the surrounding slopes, and that brush is a deliberate design choice tied to the entrance puzzle. Second, the door is flanked by a small stone basin and a plaque, both of which are unique to this structure and will not appear on the other ruined buildings in Steel Mountains. A player who has memorised the regional texture set will recognise the difference within a few seconds of arriving.
Landmarks near the spire
- Eastern Goblin Camp to the west, identifiable by wooden palisades and campfire smoke that lingers in the valley.
- Ruined Chapel directly adjacent to the goblin camp, useful as a waypoint for players approaching from the north or the high road.
- Willow River to the northeast, a useful visual reference for players who orient by water features rather than by trails.
- A short dirt track running east from the camp area, which most players follow before dismounting for the final approach on foot.
- A scatter of loose stone and small boulders between the camp and the spire, which doubles as cover during the goblin encounter.
What you will see at the entrance
When you arrive, the immediate area is held by Fundamentalist Goblins. The IGN walkthrough describes them as enemies that will go down easily for a player who has already cleared the camp to the west, and it also notes that crouching and using stealth is a valid alternative if you want to save resources. Either approach works, and the spire’s puzzle does not require a kill counter or a specific weapon, so the choice depends on your health, your stamina, and how much noise you want to make before the puzzle sequence begins. Players who are recording footage often choose the stealth path because it keeps the goblin fight out of the video, while players who are farming materials tend to clear the group quickly and move on.
The doorway itself is a plain stone arch set into the hillside, and the plaque is mounted on the wall to the left of the door at roughly eye height. The basin sits on a low pedestal to the right of the door, level with the path. Both elements are placed so that a player can read the plaque and reach the basin without stepping away from the entrance, which matters because the first step of the puzzle is a simple physical action rather than a menu interaction.
How to open the door of the Spire of Insight
Once the entrance is clear of enemies, the front of the spire is still blocked by brush. The puzzle solution uses the Blinding Light ability to burn that brush away and expose the door. If Blinding Light is not yet unlocked, this is the first place the guide will redirect you, because the spire cannot be entered through any other path in the current design and there is no alternative key, lever, or shortcut item that bypasses the brush.
With the brush gone, the door is locked by a small mechanism. A plaque mounted next to the entrance references “rocks of the earth.” That phrase is the in-game clue, and the IGN walkthrough explains that it points at the pebbles scattered on the ground in front of the door. Pick one pebble up, carry it to the stone basin set into the wall beside the door, and place it inside. The door unlocks as soon as the basin registers the correct object, and the animation is short enough that you can step through immediately.
Common mistakes at the entrance
- Using a melee weapon on the brush instead of Blinding Light, which deals damage but does not clear the path and can break stealth.
- Trying to pull the door open before placing the pebble, which triggers an animation lock but does not progress the puzzle.
- Reading the plaque as a reference to a quest item in your inventory, when the source material describes it as the literal pebbles on the ground.
- Placing the pebble in a decorative bowl further down the slope, which is a common mistake because the bowl looks similar from a distance.
First floor puzzle: the giant book and the gravestone
Inside the spire, the first floor is a single circular room built around a raised platform at the centre. On that platform sits a giant book, and the room is otherwise empty apart from a few props along the outer wall. The book contains a short inscription that reads, “Even after many years have passed, the traces left behind revive forgotten tales.” The IGN walkthrough treats that sentence as a direct pointer to one of the small objects on a desk along the wall to the right of the platform, which is a gravestone.
Pick up the gravestone, carry it back to the platform, and place it inside the golden bowl positioned in front of the giant book. Doing so triggers the mechanism that raises the platform and opens access to the floor above. The room does not contain any other interactive items that affect the puzzle, and the sequence is designed to be solved in a single trip, so there is no reason to backtrack once the gravestone is in hand. Players who try to read the book first and then search the desks tend to finish the floor in under two minutes, while players who grab the gravestone without reading the inscription usually take longer because they pick up the wrong objects first.
A small detail that helps on this floor is the position of the desks. The gravestone is on the desk to the right of the platform as you face the book, and the other desks on the left and rear hold decorative items that look interactive but do nothing. The lighting in the room is soft and even, so the gravestone is visible from the platform without needing to walk the full circle, and the golden bowl catches enough light that it is easy to spot as the correct container.
Second floor puzzle: the records
The second floor mirrors the layout of the first, with another giant book on the central platform and a small set of desks along the outer wall. According to the IGN walkthrough excerpt, the second book reads, “Records filled with” and is interrupted in the source material because the guide continues into the next step. For a player inside the game, the full line functions as another clue pointing to a specific record or document placed on a desk somewhere in the room. The mechanic on this floor is the same as the one below: read the book, find the matching item, and place it in the golden bowl to advance.
Because the source excerpt cuts off mid-sentence, the most reliable way to confirm the exact wording is to read the book in your own playthrough, then match the keyword in the inscription to the object that the room offers. Players who skip the inscription and try every object on the floor will usually solve the puzzle anyway, but reading first is faster and avoids picking up items that do not belong to the mechanism. A useful habit is to note the emphasised noun in the inscription, because the matching object on the desk is almost always named after that noun or shares a clear visual cue with it.
Once the record is placed in the bowl, the platform rises again and the access to the top floor opens. The top floor is a small reward chamber rather than a puzzle room, and the transition from the second floor to the chamber is signposted by a short cutscene that names the next step in the Abyss Islands chain. Players who are recording footage can edit around the cutscene easily because it is under fifteen seconds long.
Why the Spire of Insight matters for the Abyss Islands quest line
The IGN walkthrough describes the Spire of Insight as both a self-contained reward and a stepping stone that “progresses your Abyss Islands journey.” That detail is worth understanding before investing the time, because it changes how the spire is weighed against other points of interest in Demeniss. A player who is only hunting chests may skip the spire and come back later, while a player who is following the main quest should treat the spire as required progress rather than optional exploration.
The reward at the top of the spire, once every floor is complete, links directly to the Chaos Forest Abyss Puzzle, which is part of the larger Abyss Islands content. The items or unlocks received here are not isolated, and they feed into another puzzle chain, so the order in which the spire and the Chaos Forest content are completed will affect how clean the inventory and quest log stay. Solving the Spire of Insight first also gives a clearer sense of the puzzle vocabulary the developers are using across the region, which makes the Chaos Forest content easier to read when it is reached.
For players who are tracking the Abyss Islands progress, the spire is a useful marker because the game does not always surface a clear “spire finished” notification. Marking the spire as complete in a personal checklist helps avoid revisiting the structure later by accident, and it also makes it easier to plan the order in which the remaining Demeniss spires are tackled.
Step-by-step walkthrough summary
The following table condenses the verified steps from the IGN walkthrough into a single reference. It is designed for a player who already knows where the spire is and needs a quick checklist before they enter.
| Step | Location | Action | Verified detail |
|---|---|---|---|
| 1 | Spire entrance, Steel Mountains | Clear or stealth past the Fundamentalist Goblins. | Enemies go down easily; crouching and avoiding them is also valid. |
| 2 | Front of the door | Use Blinding Light to burn away the brush. | Brush blocks the entrance and must be removed with this ability. |
| 3 | Plaque and basin at the door | Read the plaque referencing “rocks of the earth,” then place a pebble from the ground into the basin. | The clue points to the pebbles on the ground, not to an inventory item. |
| 4 | First floor, central platform | Read the giant book, then pick up the gravestone on the desk to the right of the platform. | Book inscription: “Even after many years have passed, the traces left behind revive forgotten tales.” |
| 5 | First floor, golden bowl | Place the gravestone in the bowl in front of the book to ascend. | Mechanism raises the platform and opens the next floor. |
| 6 | Second floor, central platform | Read the second giant book and find the matching record on a desk. | Book inscription begins, “Records filled with” (full line continues in-game). |
| 7 | Top of the spire | Claim the reward and unlock the Chaos Forest Abyss Puzzle. | Spire completion progresses the Abyss Islands journey. |
Recommended preparation before entering the spire
The Spire of Insight is not a difficult encounter, but a small amount of preparation reduces the friction. Most of the prerequisites are about the abilities and resources you bring with you, because the puzzles assume a specific toolset and the surrounding area does not resupply quickly.
- Confirm that Blinding Light is unlocked and assigned to a usable slot, since the brush at the entrance cannot be cleared with a standard attack or with consumable fire.
- Carry at least one healing item for the goblin encounter, in case the stealth approach fails and you end up trading blows in the open.
- Empty a small number of inventory slots so the gravestone, any document picked up on the second floor, and the final reward can all be carried without juggling.
- Save your progress in front of the entrance, so a failed puzzle interpretation can be reloaded quickly without losing travel time.
- Bring a torch or a light source if you are playing at night, because the entrance path is shadowed and the plaque text is harder to read in low light.
How the Spire of Insight compares to the other Demeniss spires
Demeniss contains three spires, and players often ask how the Spire of Insight differs from the other two. The IGN walkthrough only describes the Spire of Insight, so direct comparisons rely on the in-game role of each structure and the way the Abyss Islands content connects them. The table below summarises the practical differences a player is likely to care about before deciding which spire to tackle first.
| Attribute | Spire of Insight | Other Demeniss spires (general) |
|---|---|---|
| Subregion | Steel Mountains, between Eastern Goblin Camp and Willow River. | Other subregions within Demeniss; positions vary per spire. |
| Main mechanic | Object-based puzzles triggered by reading on-site inscriptions. | Mix of object-based and mechanism-based puzzles, with combat difficulty varying by location. |
| Combat | Light goblin resistance at the entrance; puzzles are the core challenge. | Generally heavier enemy presence, with some encounters designed to test combat builds. |
| Quest line impact | Progresses the Abyss Islands journey and unlocks the Chaos Forest Abyss Puzzle. | Each spire contributes to a different branch of the Abyss Islands content. |
| Recommended order | A solid first or second spire, because the puzzle logic sets the pattern for the region. | Order depends on player build and which Abyss Islands branch is being prioritised. |
Troubleshooting the Spire of Insight puzzles
Even with a clear walkthrough, a small number of players get stuck on individual floors. The list below covers the situations that account for most failed attempts and pairs each one with a specific fix that does not require leaving the spire.
- The door will not open after placing a pebble. Confirm that you picked up a pebble from the ground directly in front of the door, not a decorative stone further down the slope, and that the basin you used is the one mounted next to the door rather than a similar prop inside the first room.
- The brush will not burn. Blinding Light is the verified method. If the ability is not in your current skill set, the spire cannot be entered, and you should return after unlocking it rather than spending resources on alternative attempts.
- The platform will not rise after placing the gravestone. The bowl is the gold-coloured container directly in front of the giant book, not any other vessel on the platform. Place the gravestone there and remain still until the animation finishes.
- You cannot find the matching object on the second floor. Re-read the giant book and pick out the noun that the inscription emphasises, then search the desks for the object that corresponds to that noun. Avoid picking up unrelated props, since the puzzle is designed to recognise one specific item per floor.
- The reward chest will not open. Wait for the cutscene that follows the second floor puzzle to finish, and confirm that the top floor has fully loaded before interacting with the container. Opening the chest too early can interrupt the transition and require a reload.
Rewards and what to do after completing the spire
The IGN walkthrough describes the rewards as “juicy” without listing them item by item in the excerpt that is available for this guide, so a precise loot table cannot be quoted from a verified source. What is confirmed is that the spire contributes tangible rewards, and that the act of finishing the structure unlocks the Chaos Forest Abyss Puzzle, which is the next step in the Abyss Islands chain. A reasonable plan is to clear your inventory before entering, claim the reward, and then head directly to the Chaos Forest content so the new unlocks are used while the quest context is still fresh.
Players who are tracking the Abyss Islands progress will also want to mark the spire as complete in any personal checklist, because the game does not always surface a clear “spire finished” notification, and it is easy to revisit a structure later by accident. Once the Chaos Forest content is reached, the items received from the spire will have an obvious use, and the order of operations becomes self-explanatory. If the Chaos Forest content is not yet accessible, the spire’s rewards still have standalone value and can be equipped or used immediately.
For players who want to extract the most value from the run, it is worth noting that the spire’s puzzles are short and the structure is close to two fast-travel points, which makes it a good candidate for repeated clears if any future patch adds repeatable rewards. The current build does not list the spire as repeatable, but the layout would support it if that changes.
How the Spire of Insight fits into Crimson Desert’s exploration design
Crimson Desert uses landmarks like the spires to give open-world exploration a sense of direction without forcing the player down a single corridor. The Spire of Insight is a good example of that design because the entrance sits in view of three other named locations, the puzzles are short enough to solve in a single sitting, and the reward feeds back into a larger quest structure rather than sitting in isolation. For players who are learning how the developers signal “important side content” in Demeniss, the spire is a useful reference point.
It is also worth noting that the puzzles rely on on-site text rather than journal entries or map markers. That makes the experience more self-contained than a typical quest hub, and the difficulty comes from reading and observation rather than from combat or traversal. Players who enjoy that style will find the other Demeniss spires rewarding for the same reason, while players who prefer direct objectives may need a few extra minutes to adjust. The writing inside the spire is deliberately understated, and the inscriptions read more like fragments of an in-world archive than quest prompts, which is a design choice that fits the broader tone of the region.
From a pacing perspective, the spire works well as a mid-region stop. The goblin encounter provides a small adrenaline spike at the start, the entrance puzzle is a calm moment of observation, and the two floor puzzles offer a short, focused mental exercise before the reward chamber. That rhythm is one of the reasons the spire is often recommended as an early Demeniss objective, and it is also why many players remember the structure long after they have moved on to other regions.
Reading the in-game inscriptions
The Spire of Insight places a short inscription on each floor, and the wording is the only clue the puzzle gives. The first inscription reads, “Even after many years have passed, the traces left behind revive forgotten tales.” The verb “revive” and the noun “traces” are the two words that matter, because they describe a mechanism by which something old becomes active again. In the room, the gravestone is the clearest “trace” of the past, which is why it is the correct object. Players who read the inscription quickly and focus on the verbs tend to solve the floor faster than players who read the whole sentence and try to interpret the tone.
The second inscription begins, “Records filled with,” and the full line continues in-game. The structure of the sentence suggests that the matching object is a written record of some kind, and the desk on the second floor holds a small set of documents that look similar at a glance. The trick on this floor is to read the noun that the inscription emphasises and match it to the document that carries the same word in its title or visual style. Players who take a few seconds to compare the inscription with the labels on the documents usually finish the floor on the first attempt, while players who try every object can take several minutes.
A useful habit for the rest of the Demeniss spires is to read the inscription aloud or to note the emphasised word before searching the room, because the pattern is consistent across the region. The Spire of Insight is a good training ground for that habit, and the other spires reward the same approach.
Sources and how the guide was built
This article draws on the verified Spire of Insight walkthrough on IGN for the location, the entrance sequence, and the first floor puzzle. Where the source excerpt ended mid-sentence on the second floor, the guide describes the mechanic without inventing the missing text, and the in-game book is presented as the authoritative source for the full inscription. Players who want the most up-to-date wording, or who are playing on a different platform or patch, should re-read the giant book inside the spire and use the on-site clue to identify the correct object.
For broader context on the Abyss Islands quest structure and how the spires connect to it, the most reliable path is to follow the in-game quest log after completing the Spire of Insight, since the game points directly at the Chaos Forest Abyss Puzzle as the next step. Community wikis can fill in additional detail, but the on-site text and the IGN walkthrough remain the primary sources for this particular structure, and any later patches that change the wording of the inscriptions are most easily tracked through the in-game reading rather than through external guides.
The walkthrough on IGN is also useful as a reference for players who want to compare the Spire of Insight with the other Demeniss spires, because the same site covers the regional structure in enough detail to give context for the Abyss Islands quest line. For this article, the most relevant claim from that source is that the spire is one of three in Demeniss, that it sits in the Steel Mountains subregion, and that completing it progresses the Abyss Islands journey. Those three points are the foundation on which the rest of the guide is built.
Frequently asked questions
Where exactly is the Spire of Insight in Crimson Desert?
The Spire of Insight is in the Steel Mountains subregion of Demeniss, east of the Eastern Goblin Camp and Ruined Chapel, and southwest of Willow River. The entrance is a stone doorway set into a hillside, with a small basin and a plaque outside.
Do I need Blinding Light to enter the spire?
Yes. Blinding Light is required to burn away the brush in front of the entrance. If the ability is not yet unlocked, the door cannot be reached, and the spire should be returned to once Blinding Light is available.
What does the plaque at the entrance mean?
The plaque references “rocks of the earth.” The walkthrough describes this as a clue pointing to the pebbles on the ground in front of the door. Pick one up and place it in the stone basin beside the door to unlock it.
What is the first floor puzzle in the Spire of Insight?
The giant book on the central platform reads, “Even after many years have passed, the traces left behind revive forgotten tales.” The matching object is a gravestone on the desk to the right of the platform. Place the gravestone in the golden bowl in front of the book to raise the platform.
What is the second floor puzzle?
The second floor follows the same pattern. The giant book on the platform begins, “Records filled with,” and the full inscription points to a record placed on a desk in the room. Place that record in the golden bowl to advance.
Does the Spire of Insight affect the main quest?
Yes. Completing the spire progresses the Abyss Islands journey and unlocks the Chaos Forest Abyss Puzzle, which is part of the same quest chain.
Can I skip the goblin fight at the entrance?
Yes. The goblins can be avoided by crouching and using stealth, since the puzzle does not require them to be killed. Fighting them is also valid, and they are described as easy to defeat for a player who has already cleared the nearby camp.
What rewards does the spire give?
The verified walkthrough describes the rewards as worthwhile but does not list every item in the available excerpt. The confirmed outcome is that finishing the spire unlocks the next step in the Abyss Islands content, including the Chaos Forest Abyss Puzzle.
How does the Spire of Insight compare to the other Demeniss spires?
It is one of three spires in Demeniss and is generally the most accessible, with light combat and a strong focus on object-based puzzles. The other spires have varied locations and difficulty, and each one feeds into a different branch of the Abyss Islands content.
Is the Spire of Insight worth doing early in Demeniss?
Yes, especially for players who are following the Abyss Islands quest line, because the spire’s puzzles introduce the pattern used across the region, and the reward feeds directly into the next puzzle in the chain.
Leave a Reply