
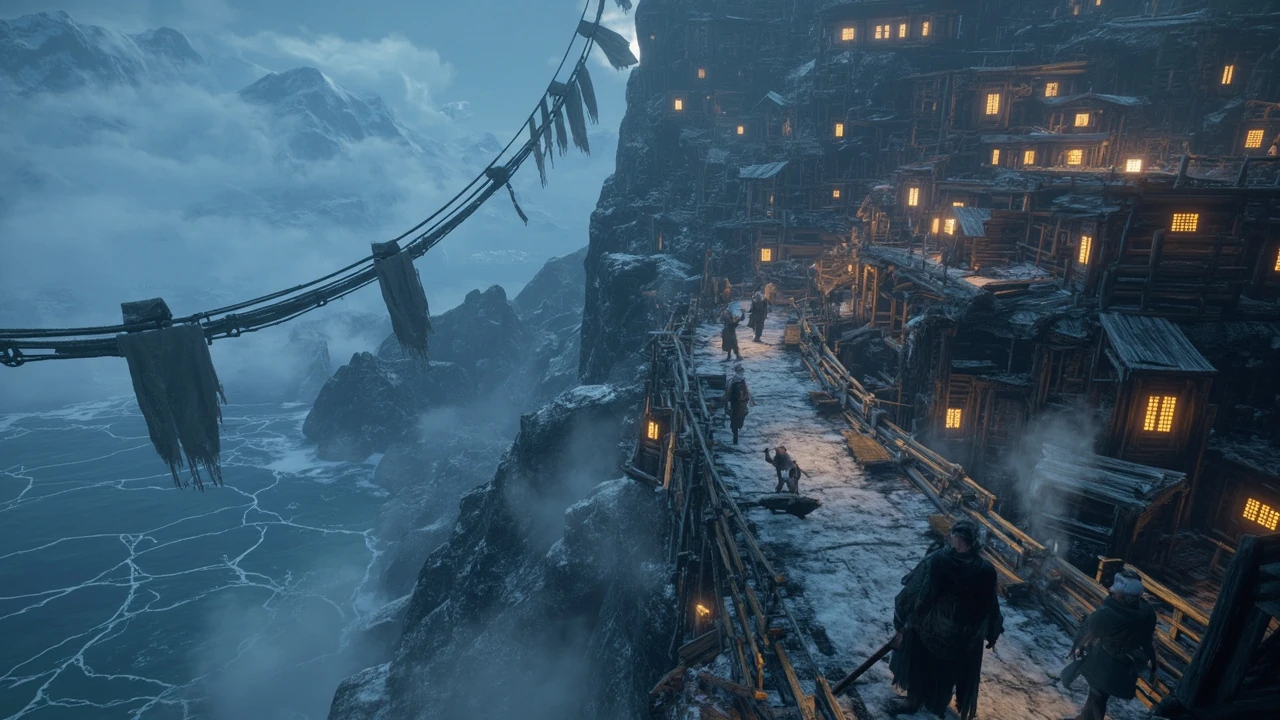
Rito Village in Tears of the Kingdom: getting to the Hebra settlement
Rito Village sits in the middle of Lake Totori, high in the Hebra Mountains, and is the only real settlement in that region. The bridge that historically connected the village to the southern road is damaged at the start of the story, so the first journey into Hebra is one of the trickier early routes in Tears of the Kingdom. The lake itself is wide and exposed, and the cold snap that grips the region makes the climb unforgiving if you arrive underprepared. Wind rolls straight across the open water, and the temperature drops noticeably as you move from the foothills up to the cliffside.
Because of that bridge state, most players reach the village by air rather than by foot on a first pass. The fastest route is to unlock a Skyview Tower to the south and glide from there across the snow, which also gives a useful overview of where the houses, the inn, and the flight range sit in relation to each other. From that angle, the layout reads as a layered settlement: a lower cluster near the water, a middle ring with shops, and the elder’s perch and shrine approach climbing higher up the cliff. Once you have that map in your head, every later trip becomes quicker, because you know which rooftops you can land on safely and which paths lead back down to the bridge.
This guide focuses on what the village actually contains and what to plan for when you arrive: the characters who drive the regional story, the side activities that reward exploration, the merchants worth stocking up at, and the small but useful landmarks such as shrines and korok seeds that are easy to miss on a first pass. None of the steps are hidden, but the order in which you handle them changes how harsh the rest of Hebra feels. A player who lands, activates the shrine, talks to Teba, repairs the bridge, and then stocks arrows will have a very different experience from one who runs straight for the next quest marker.
Where Rito Village is and how the region is laid out
Rito Village occupies a rocky peninsula in Lake Totori, ringed by steep cliffs and open water. The geography shapes how the area plays: a long bridge approach to the south, a flight range to the north across Dronoc’s Pass, and snow-blown cliffs above the village that funnel the wind across the lake. The peninsula is narrow enough that you can stand in the central plaza and see most of the village at once, which is part of why the place feels cohesive despite being built on multiple levels.
From a level design standpoint, the village is the calm center of an otherwise harsh region. The Hebra Mountains around it are cold, vertical, and full of tough enemies, while the village itself is enclosed enough to feel safe without being claustrophobic. Most of the action in the region radiates outward from this hub, and almost every long Hebra quest asks you to come back here at some point to restock, sleep, or turn in progress. The result is that the village becomes a regular reference point, the way Kakariko Village is for Central Hyrule or Hateno Village is for the eastern coast.
The lake also matters more than it first looks. Lake Totori freezes over in parts, which means certain surface encounters and resources only appear depending on the time of day and the in-game weather. The cold air sits over the water and produces the kind of misty low-visibility mornings that make early flights across the lake feel riskier than they need to be. Players who time their glides for the clearer parts of the day tend to get to the village in better shape.
How to reach Rito Village on a first visit
The southern bridge is broken until you complete the side quest to repair it, so the realistic first route is from the air. The Rospro Pass Skyview Tower launches you high above the village, and a simple glide south drops you onto the plaza or onto the rooftops with a comfortable margin. If you are short on stamina, the same glide is easier to manage by aiming at the sloped rocks on the western edge of the peninsula and then walking the last stretch to the central area.
Ground approaches are still possible, but they cross deep snow and high-elevation paths that are slow without warm food or proper armor. Players who want to walk in should plan for either a sunshroom-rich meal or the Snowquill set, which is sold in the village armor shop once the regional blizzard has been lifted. Without one of those, hearts will start ticking down the moment you step off the road and into the deep snow, and the recovery options between the trailhead and the village are limited. A few warm dishes cooked before departure are usually enough to cover the walk, but armor is more reliable for the return trip when food has already been spent.
There is also a third option that a lot of players miss: paragliding from a high point on the cliffs above the village itself. Once you have the regional map opened up, the peaks east of the peninsula become a useful launch point for descending straight onto the elder’s perch. It is not the most obvious first route, but on a second or third visit it saves the long detour through the Skyview Tower.
Getting to the Rospro Pass Skyview Tower
The tower is reached by following a long road north from the Hebra Trailhead Lodge, which sits in the foothills above the village. On a normal playthrough, the tower is one of the first Hebra landmarks Link interacts with, because the regional main quest routes the story directly past it. The road itself is the kind of climb that feels longer than it looks on the map, partly because of the constant cold and partly because the elevation keeps changing as you cross the switchbacks.
The climb up the tower road is a useful early test of the player’s gear. The temperature drops as the path rises, and the enemies near the top are tougher than the early-game baseline. Treating the tower road as a real preparation step, rather than a straight line on the map, is what makes the rest of the Hebra arc feel manageable. A player who arrives at the tower undergeared will spend most of the climb avoiding enemies, while a properly warmed-up player can clear them and reach the launch point with full resources.
Once the tower is activated, the map fills in a useful wedge of Hebra. That map information matters more than it sounds, because the surrounding mountains are dense with caves, shrines, and side quests that are very hard to find without the topographic reveal. Skipping the tower on the way to the village means returning to it later anyway, so the most efficient pattern is to unlock it on the way in and glide down.
What changes when Regional Phenomena arrives
When Link first reaches the village, a massive blizzard is gripping Hebra. The wind and cold make the surrounding mountains much harder to traverse, and the village itself looks tense rather than welcoming. The Rito are dealing with a failing climate, and the elders are actively coordinating a response. Lanterns and tents are pitched in unusual places, and the guards around the perimeter are watching the sky more than the roads.
Resolving the blizzard is the keystone for the entire region. Once the cold snap breaks, paths that were punishing become walkable, new resources appear, and shop inventories change. A lot of “stuck” moments in Hebra trace back to trying to push forward before the blizzard is over. The game does not always telegraph that fact clearly, and several side activities read as difficult by design when they are actually waiting for the weather to clear. Recognizing the blizzard as a single global flag rather than a series of small puzzles helps with pacing.
It is also worth noting that the blizzard affects the flight range directly. The aerial training and archery challenges are noticeably harder in heavy wind, and a few of the related quests cannot be completed cleanly until the wind dies down. Players who try to clear the flight range before the regional main quest is finished often end up redoing objectives later, because the wind changes the way the targets behave.
The Rito people and who lives in the village
The Rito are bird-like people with feathered wings, and the village is the heart of their culture in Hyrule. The playable Rito champion in the regional story is Tulin, son of Teba, who takes over a leadership role during the crisis. Teba functions as the acting village elder while the previous elder, Kaneli, is occupied at the flight range north of the village. The split between the two locations is a deliberate choice that puts the player in front of Teba in the village and in front of Kaneli in the training grounds, so each character has room to develop on their own terms.
Kaneli is still relevant, but he is rarely on-site. Asking around the village for him sends players to the flight range near Dronoc’s Pass, which is also the source of several side activities and one of the more interesting combat encounters in the region. The village is happy to talk about Kaneli once you mention him, and a short conversation with the right villager is usually enough to get the direction you need. The Rito as a community are also more direct than some of the other regional groups in the game, which makes asking for help less of a chore than it can feel in larger settlements.
It helps to think of the village as a small society with its own routines. Pilots repair their bows, traders cycle stock, and the inn runs a steady rotation of travelers. When the blizzard is in effect, those routines are visibly disrupted, and the same characters can be found in different parts of the village depending on the time of day. Once the weather lifts, the village returns to a quieter rhythm, and the side quests that touch on those routines become more obviously about the people than about the crisis.
Key characters and what they ask you to do
The main quest for the region, Tulin of Rito Village, is the entry point into the Hebra storyline. Tulin wants Link’s help ending the blizzard, and the village elders want someone capable on the ground while they manage their own people. The flow is deliberately structured so the player understands the village’s situation before being sent out into the storm. Tulin’s role is more personal than the title suggests: he is also proving himself as a young pilot, and the quest balances the larger weather problem with his own arc as a leader.
Side characters around the village tend to mirror the main themes. There are pilots, traders, and family members with small personal requests, and almost every side quest ties back to either the blizzard, the flight range, or supply problems caused by the cold. Treating the village as a small society with real problems, rather than a quest dispenser, makes the side content feel coherent. A few of those characters are also efficient sources of arrows, materials, or warm meals once you have worked out who cooks what and when.
Teba in particular is a useful early point of contact. He assigns most of the practical tasks around the village and has a clear sense of what the player can and cannot handle. Returning to him after a side quest tends to advance the main story in small steps, which keeps the pacing tight without forcing the player to choose between the main and side content. Several of the side quests are designed to dovetail with his requests, so doing them in roughly the order he suggests avoids doubling back across Hebra.
Shops, services, and what to stock up on
Rito Village hosts an inn, a general store, and an armor shop. The general store is the place to check first for arrows, which are a defining resource of the region: the Rito rely on ranged combat, and the surrounding quests consume a lot of ammunition. Buying a healthy stock on arrival tends to save a long trip back later. The same shop also stocks basic cooking ingredients, and the inventory shifts once the blizzard has been resolved, so a return visit is worth planning for.
The armor shop stocks the Snowquill set, which provides cold resistance once the blizzard clears. It is the standard cold-weather loadout for the rest of the Hebra arc and is worth buying even if only one piece is needed immediately. Each piece stacks with food effects, so a full set plus a warming meal covers almost any Hebra climb without further preparation. The inn is a useful waypoint between expeditions: a single rest restores hearts and removes the cold-state penalty if the player has been outside long enough to take chip damage.
Cooking also remains relevant throughout the region. Sunshroom dishes, combined with warm clothing, cover the rest of the cold-resistance needs. The For additional context, village has a permanent cooking pot near the central area, and the surrounding cliffs are reliable hunting grounds for birds and small game. Players who treat cooking as a regular habit, rather than an emergency tool, tend to find the entire Hebra arc less stressful because they rarely run out of warm meals when they are needed most.
Cold-weather prep checklist
Players often underestimate how much Hebra drains their resources. A simple prep routine makes the entire region smoother and removes most of the deaths that happen on first-time climbs.
- Bring or buy the Snowquill set, or at least the headpiece, before venturing north.
- Cook a Spicy or Sunny meal using Sunshrooms found in the wild or bought in the village.
- Restock arrows at the general store; the flight range and blizzard quests burn through them.
- Carry a few warm-durable weapons, since wooden and metal gear lose temperature effects in snow.
- Save before any long climb or shrine run; the elevation punishes mistakes.
- Activate the Gatakis Shrine as soon as you arrive so fast travel back to the village is one step.
This is a standard operating list for Hebra rather than something specific to the village, but most of the ingredients are easiest to assemble inside the village before heading out. The general store handles arrows, the armor shop handles the set, and the cooking pot handles the meals. Once that triangle is in place, the rest of the region is more about route planning than about survival.
Shrines, fast travel, and small landmarks
At the bottom of the spiral stairs in the village is a useful cluster of permanent features: a Guardian Statue, a Korok Seed, and the Gatakis Shrine, which opens up easy fast travel. The shrine is a short puzzle that rewards careful observation of the village layout, and the resulting fast-travel point shortens trips to and from the southern road for the rest of the game. Solving the shrine also gives a small Light of Blessing, which is one of the incremental upgrades that makes the long Hebra climbs easier over time.
The Guardian Statue offers a free revive in exchange for a collected spirit, which is one of those quality-of-life features that becomes very valuable during the longer shrine runs in the surrounding mountains. New players tend to overlook it on a first pass because it is tucked into a side path. Once you have used it once, however, it becomes a habit to stop by whenever you return to the village, especially after a tough shrine or a failed combat run.
There is also a Korok Seed at the bottom of the spiral stairs, which is easy to walk past in the rush to the shrine. The puzzle is short and the reward is small, but the seed adds up to inventory expansion over the course of the game. Several other Korok Seeds are scattered around the village, hidden on rooftops, under planks, and behind barrels, and most of them can be picked up in a single slow lap of the settlement. Doing that lap on the first visit is a useful habit because it makes later returns simpler.
Side quests worth picking up in the village
The village is dense with side content, and most of it is small enough to complete in a single in-game day. The Rito Rope Bridge restoration is the obvious one, because it gives you a reliable ground route in and out of Hebra for the rest of the playthrough. Without it, every visit to the village means planning around wind and altitude, and the bridge also opens up the option to bring a pack animal or a wagon across the lake if you have the patience to set one up.
Other notable side quests cluster around the flight range and the village shops. Several are tied to pilots who need help with deliveries, with missing equipment, or with testing new approaches to the cold. None of them are mechanically complicated, but they reward attention to the village as a living place rather than a fast-travel node. A few of them also unlock small but useful rewards, like extra arrow stock at the general store or new recipes at the cooking pot, which makes them worth doing on a first visit rather than saving for later.
There is also a recurring delivery quest in the village that asks the player to move packages between the elder’s perch, the flight range, and the general store. It is not glamorous, but it is a reliable source of rupees and a good way to learn the layout of the settlement. Doing it once on a first visit is the fastest way to memorize the rooftops and stairways that you will use for the rest of the game.
The flight range and Kaneli’s location
Kaneli, the previous village elder, is at the flight range near Dronoc’s Pass, which sits north of the village. The flight range is a key training area for Rito archers, and it is the source of a few of the more interesting combat encounters in Hebra. A side quest or two routes the player out here to interact with Kaneli or help the trainees. The flight range also doubles as a combat testbed: the same targets that the Rito use for practice can be used by Link to test bows and arrow types, which is helpful for finding a loadout that fits the region.
Reaching the flight range is also a useful mid-game check. By the time the player is comfortable making the trip regularly, the rest of the region starts to feel familiar, and the village begins to function as a base rather than a destination. The path north passes through some of the more vertical terrain in Hebra, and a few of the shrines along the way double as shortcuts once they are activated. Over the course of a playthrough, the flight range goes from being a remote side location to being a normal stop on a regular circuit.
The flight range is also where several of the more memorable aerial combat encounters in the game take place. The targets are high in the sky and require either good aim or good use of wind currents to reach. Players who have spent time in the village practice range before heading up tend to do better here, because the muscle memory from short-range shots transfers directly to the longer aerial targets.
Local resources and what they are used for
After completing the Hebra portion of Regional Phenomena, the village’s local resources become reliable. Tabantha Wheat and Sunshrooms are both available in and around the settlement, and they cover two important needs: cooking staple ingredients and a steady source of cold-resistance meals. The general store carries Tabantha Wheat in particular, and it is one of the most efficient sources in the game because the village is a fast-travel destination with a permanent merchant.
| Resource | Where to find it | Primary use | Availability note |
|---|---|---|---|
| Tabantha Wheat | Village general store and surrounding fields | Cooking staple, baking recipes, warm dishes | Stock improves after the Hebra portion of Regional Phenomena |
| Sunshroom | Forest edges and warm rocks near the village | Cold-resistance meals when combined into recipes | More common after the blizzard is resolved |
| Chillshroom | Snowy slopes and Hebra highlands | Cooling meals and some elixir bases | Available year-round on cold terrain |
| Warm Safflina | Rocky areas of the Hebra region | Spicy cooking, warming elixirs | Found in clusters near cliff walls |
| Hylian Pine | Edges of the Hebra tree line | Stamina recovery and some shop recipes | Reliable once the regional blizzard lifts |
These five resources are the practical foundation for surviving Hebra. The village is the most reliable place to stock up on Tabantha Wheat, which is one of the reasons the settlement works as a hub even when the bridge is broken. The same resources feed into most of the warming recipes in the game, and a small stockpile carried up to the flight range is usually enough to cover a full session of aerial combat without needing to retreat.
Enemies and combat expectations around the village
The village itself is safe, but the surrounding area is not. Lizalfos, Ice-Breath Lizalfos, and White-Maned Moblins are common in the cliffs above, and the flight range pulls in tougher aerial enemies. Combat around Hebra is more about patience and ranged tools than raw melee power. Enemies in the deep snow are slower than their lowland counterparts, but they hit harder and have more reach, which makes sloppy play expensive.
A practical habit is to engage enemies from elevated positions where possible, using the vertical layout of the cliffs to control distance. The village’s economy supports that playstyle, which is why the general store’s arrow stock and the flight range’s archery challenges exist in the same region. Players who lean on bows and bomb arrows early in Hebra tend to clear the local camps faster than those who try to brute-force through with melee, especially because most enemy camps are positioned to reward a well-timed aerial approach.
It is also worth knowing which enemies drop useful materials. Ice-Breath Lizalfos in particular can drop horn and fang materials that feed into a small number of cold-related elixirs, and White-Maned Moblins drop meat that combines well with warm ingredients for heart-recovery meals. Taking a moment to clear a camp with a ranged build, rather than skipping it on the way to a shrine, pays off in materials that make later trips smoother.
Comparing Rito Village to other regional hubs
Each regional hub in Tears of the Kingdom has its own character, and the village is more vertical and more weather-driven than the others. Comparing them makes the design intent clearer.
| Hub | Region | Defining challenge | Signature resource | Signature traversal |
|---|---|---|---|---|
| Rito Village | Hebra Mountains | Cold and wind | Sunshroom and Tabantha Wheat | Skyview Tower glides from Rospro Pass |
| Goron City | Death Mountain | Heat and lava | Fireproof lizards and ore | Minecarts and elevated lifts |
| Zora’s Domain | Lanayru | Rain and sludge | Brightbloom seeds and frogs | Waterfalls and Zora armor swimming |
| Gerudo Town | Gerudo Desert | Heat and sand | Voltfruit and Hylian Pine | Sand seals and oasis crossings |
| Kakariko Village | West Necluda | Standard combat encounters | General goods and fairy fountains | Standard roads and short climbs |
The village’s signature feel is its relationship with altitude. Most of the other hubs sit in wide basins or built-up cities, while the village feels like it is gripping the edge of a cliff in a snowstorm. That difference shapes how players approach every task in the region, from the way they stock up before a shrine run to the way they choose routes between objectives. Once the design intent is visible, the rest of the game’s regional hubs start to feel like variations on the same idea, each one tuned to a different kind of weather and a different kind of traversal.
What to do first in the village on a new save
On a fresh file, the order of operations in the village is fairly consistent. The story pulls the player toward Tulin and the elders, but the supporting actions are what make the rest of Hebra manageable.
- Land in the central plaza and talk to Tulin or Teba to start the regional main quest.
- Pick up the Rito Rope Bridge side quest so the ground route opens up for later visits.
- Stock arrows and any Snowquill pieces available at the general store and armor shop.
- Activate the Gatakis Shrine at the bottom of the spiral stairs for fast travel.
- Cook at least one warming meal using Sunshroom or Warm Safflina before heading out.
- Visit the flight range north of the village to check in with Kaneli and unlock related side content.
- Sweep the village for Korok Seeds while the layout is still fresh, then return to the elder’s perch.
Following that order means the player has fast travel, warm gear, and a working ground route in place before the blizzard storyline takes them into the harsher parts of Hebra. It also keeps the side content from piling up: most of the village quests are short, and doing them in the same visit as the main quest is more efficient than splitting them across two or three later trips.
Common early problems and how to avoid them
Most frustration in the village comes from arriving without a plan. The most common issues are simple to anticipate once they are named.
- Arriving without cold protection and losing hearts to the snow before reaching the shops.
- Forgetting to repair the bridge and being stuck with only air routes into Hebra for the rest of the game.
- Ignoring the Gatakis Shrine and missing the fast-travel point that makes the rest of the region manageable.
- Skipping the general store and running out of arrows during the flight range encounters.
- Leaving the village before tracking the regional main quest, which makes the blizzard storyline harder to follow.
- Selling arrows early for rupees and then needing to grind for replacements before the next shrine run.
None of these are hidden mechanics, but they are easy to miss in the rush to follow the next quest marker. Treating the village as a real hub with its own setup steps changes how the rest of Hebra feels, and most of the same lessons apply to the other regional hubs later in the game. A small investment in preparation on the first visit tends to pay off across dozens of later trips.
Why the village matters beyond its quests
The village is more than a checkpoint. It anchors one of the game’s strongest regional arcs and ties the Rito culture to the broader story about Hyrule’s recovery. The decision to make the bridge broken at the start, and to make the only reliable first route an aerial one, is a deliberate design choice that teaches the player how to use the new sky-based traversal early. By the time the blizzard storyline is over, the player has used Skyview Towers, gliders, and updrafts enough times that the rest of the game feels easier to navigate.
Once the blizzard is resolved, the village becomes a quiet place again. That shift is part of the point. The Rito are people who live with the weather, and the game is most effective when the player feels that change in the settlement itself, not just in the quest log. The same characters are doing slightly different things, the same rooftops are visible from different angles, and the surrounding peaks stop feeling like a wall. A short return visit after the regional story is complete tends to underline that shift, because the village reads as a calmer and more functional place than it did on the first arrival.
Frequently asked questions
Where is Rito Village in Tears of the Kingdom?
Rito Village is in the middle of Lake Totori in the Hebra Mountains. It is the only real settlement in that region, built on a rocky promontory above the frozen lake.
How do you reach Rito Village when the bridge is broken?
The most reliable early route is to launch from the Rospro Pass Skyview Tower to the south and glide down into the village. The southern ground bridge only becomes usable after completing the Rito Rope Bridge side quest.
What is the easiest way to get to the Rospro Pass Skyview Tower?
Follow the long road north from the Hebra Trailhead Lodge. The road is part of the route the regional main quest takes, so most players reach the tower as part of the Tulin of Rito Village quest.
What is the blizzard in Rito Village and how do you stop it?
The blizzard is the Hebra portion of the Regional Phenomena storyline. It can be lifted by progressing the Tulin of Rito Village main quest and completing the related objectives in the region. Once the blizzard ends, the surrounding mountains become far easier to traverse.
Who is the elder of Rito Village during the story?
Teba acts as the village elder during the events of the game, while the previous elder, Kaneli, is stationed at the flight range near Dronoc’s Pass. Asking around the village for Kaneli is a reliable way to unlock related side content.
What shops and services are in Rito Village?
The village has an inn for resting, a general store for arrows and basic supplies, and an armor shop that stocks the Snowquill set once the blizzard has cleared. A cooking pot is available near the central area for preparing meals.
Is there a shrine inside Rito Village?
Yes. The Gatakis Shrine is at the bottom of the spiral stairs in the village, alongside a Guardian Statue and a Korok Seed. Activating the shrine unlocks fast travel and is one of the first things to do on arrival.
What are Tabantha Wheat and Sunshrooms used for?
Tabantha Wheat is a baking and cooking staple sold in the village general store, and Sunshrooms are used in cold-resistance meals. Both become available in larger quantities after the Hebra portion of Regional Phenomena is complete.
Are there side quests to pick up in Rito Village?
Yes. The most important is the Rito Rope Bridge, which restores the southern ground route. Several smaller side quests involve pilots, deliveries, and the flight range, and most of them are short enough to finish in one in-game day.
Do you need cold resistance to explore around Rito Village?
Cold resistance is strongly recommended for the surrounding mountains. The Snowquill set from the village armor shop, combined with a warming meal made from Sunshrooms or Warm Safflina, is the standard approach for surviving Hebra.
Leave a Reply